Pinhole Photography
What is pinhole photography?
Pinhole photography is the simplest form of a camera, It can be created using different materials for example cardboard and containers can be used to create the camera. In the past people have been known to transform whole rooms into a pinhole camera. The light is projected into a tiny hole and the photographic paper captures the picture. The container has to be sprayed or painted black inside so the light doesn't bounce around inside the camera.
History of pinhole photography
Pinhole cameras have been recorded in Chinese texts from the fifth century BC. Mo Ti was a philosopher who is believed to have invented the pinhole camera. At this time is was not use at a art form. In the 1880's people started to use pinhole photography for this purpose. These images looked similar to painting being produced at the same time.
How to make a pinhole camera
1.You will need a box, photo paper, thin piece of metal like a can or brass shim, tape, scalpel, needle, and sand paper.
2.Make a pinhole in a piece of tin foil.
3.You can use various containers, including: a gravy container, mini cheddar box, or a milo tin. The box must be light proof. When the lid is on and the shutter is closed the inside is completely dark. The only light comes through the pinhole. Make sure there are no holes or openings in the box. Seal it and paint it flat black. Cut a small square opening in the box for the pinhole to go in.
4.Tape the pinhole behind the square opening. I use electrical tape. Centre the pinhole in the square. Then make the shutter which is just a flap that covers the pinhole from the outside. It can be made from some more tape.
5.Load the photo paper in complete darkness when finish put the lid on and make sure the shutter is closed. Now you can go out in the light.
6.Point the camera at what you want to shoot. It works best when it is bright and sunny. Depending on lighting and clouds hold shutter open for 30 seconds to 4 minutes then close. Everything has to stay perfectly still. Go back to the dark room and take paper out to develop.
A evaluation of a pinhole image

It a bike with a horse with the focus mainly on the bike. It black and white with a lot of dark shadows in the corners. There is a reflection of a man in the picture. The man looks like a ghost because the man is not in focus. The photo has been taken from the ground. There is a lot of contrast which is unusual for a pinhole hole image. In the middle of the image the grass is white where as the edge of the images is black. The image looks like it have been blurred because of the man in the background. The composition of the bike is central to the image. The texture of the grass in the image is contrast with the sky.
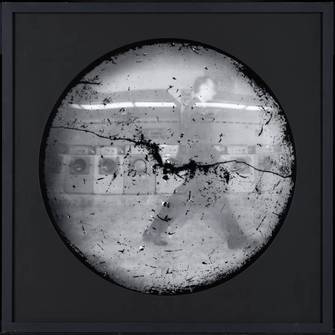
Steven Pippin
The images below were created by Steven Pippin. I have chosen 4 images of his pinhole photography.
|
The first image that I have chosen is a man walking in a laundrette. In the picture you can see the light overexposed in the background because the lens were expose for too long. The image is shady and in the middle of the image there is a dark crack going across.
|
