Cyanotypes
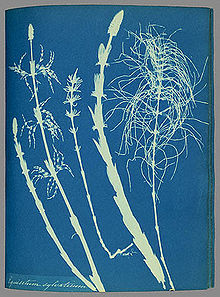
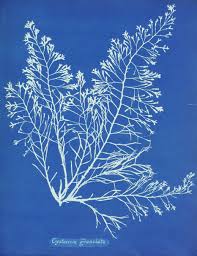
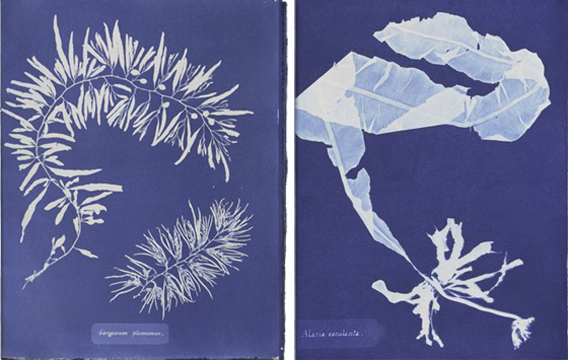
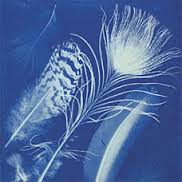
Cyanotype is a photographic printing process that gives a cyan blue print. Two chemicals are uses in the process. The process was popular with engineering circle. However Anna Atkins made cyanotype famous in the 1800's. She created images using flowers and plants. Here are some of her images.
Step 1 Choose a design that you want to print. Some ideas: flowers, leaves, photograph negatives, drawings on acetate, computer generated images on acetate, toys, clip art, found objects, etc.
Step 2 Remove your cyanotype material from its UV safe bag and place it on a ridged flat work surface. Make sure to keep the unused materials in there UV safe bag. Press air out of the bag to keep materials fresh, then tape to seal.
Step 3 Lay, pin or tape down your design. A sheet of plexi glass works well to secure the design in place.
Step 4 Expose your design facing the sun. If it does not face the sun, it will print the shadows of your objects, which can create a very interesting effect. Moving or changing your design around during your exposure time, can give another creative effect.
Exposure times Expose cyanotype cotton or watercolor paper for 10-20 minutes and cyanotype silks for 5-10. A heavier silk, like charmeuse, will need a longer exposure time and a lighter silk, like chiffon will need less time. To help manage your result and avoid wasting time and materials, make an exposure test strip that includes a range of times on a small single piece of fabric or paper.
Step 5 Rinse the exposed cyanotype materials in water, after you remove your design. Rinse until the water runs clear. You will see your cyanotype magically appear and also see why cyanotypes are amazing!
Step 6 Dry fabrics in clothes dryer or hang to dry outdoors. You can use an iron to press out any wrinkle in the fabric. Dry watercolor paper by laying it on a towel/blotter or by using a hair dryer. The final rich cyan/Prussian blue color of your print will stabilize (darken slightly) in 12-24 hours.
Anna Atkins
Anna Atkins was born on the 16th March 1799 in Tonbridge, Kent and died on the 9th June 1871. She only had access to a camera by 1841 and sources claim she was the first female photographer. She done her cyanotypes by using contact printed by putting the original paper onto yhe cyanotypes paper. Some of her work was done by using different technique, like putting an object onto light-sensitized paper which is exposed to the sun to produce an image. Her work was inspired by her interest in botany.
|
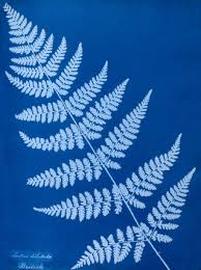
In the photograph there is a branch of a tree that have fallen down from a fern tree. This image is something to do with nature and the branch is compose in the middle but they the whole page up. This was done in a dark room and let light shine onto the object but not for a long time. By her doing this is allow the branch to be clear and show every detail of it. The branch is laid out clearly and simple because it shows the whole branch and don't miss anything out.
|
